Moving!
Pics Can Talk is getting it’s own domain and hosting and moving to www.picscantalk.com.
The new site and move will see a change and a full upgrade of what the site originally had.
In addition to the current offerings of articles, photography resources and links, I will be introducing new and exciting stuffs such as :
- Daily high-resolution pics
- More free photography articles
- Free online photography courses
- Specific photography related e-books
- Recommended photography products
- Photo-editing and advanced digital imaging tutorials
- Exclusive invites to workshops and outings
- Contest with prizes to be won
- ..and much more.
So be sure to be on the look-out for the new grand reveal of www.picscantalk.com!
If you want to find out more, drop me a message!
Twitter – www.twitter.com/kennygoh
Plurk - www.plurk.com/kennygoh
FaceBook – ID : kennygoh
Tea Plantation
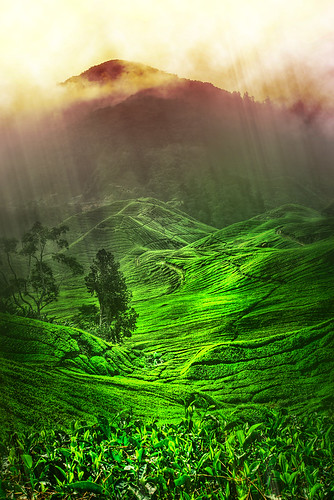
It's been a year since I've uploaded this image to my Flickr site. Today I revisit it again, still charmed by how it turned out.
A bit of imagination and light touches defined how I perceived the Hills of Cameron Highlands to be. I will be making another visit here soon to get more shots like this.
I'll be adding this to my collection of favourites on my Flickr site. Hope you like it as much as I do!
Creating a Unique Tilt-Shift Photography Blurring Effect
Posted by Kenny in effects, lens, miniature, photoshop, techniques, tilt-shift
In the old days of photography, we often see techniques to create special effects done right from the stage of taking the shot. One creative technique of manipulating the sharpness of a shot and creating a fake depth-of-field look is tilt-shift photography. In the past, this method of displacing the a lens on bellows so that the plane of focus is not at the right angle to the film surface creates a unique effect that has the scene looking almost like a fake miniature.

| Look mom! Toy cars!!! |
What makes the scene look like a miniature?
When you take close-up of a miniature set, the first thing that sets the scene is the angle that you are shooting from. Usually, from a 25 degree to a 45 degree angle would be how you may be standing above the set to take the shot of the scene. The second factor is the shallow depth-of-field that will usually result as you are taking a close-up or almost a macro shot of the scene right up close. These two factors are what is required for your mind to perceive the view of a miniature scene.
Highlighting the focus of your shot.
This technique can also be used to the extreme level to highlight the focus of your picture. Such as in portraiture, you can simulate the effect by putting the focus of your subject rendered sharp whilst keeping everything else in the scene blur.
Sometimes in a particularly busy scene, you may resort to this technique to reduce the focus on distracting elements. Applying this technique keeps your scene simple and clean.
How do you simulate a tilt-shift photography blurring effect?
Step 1 : Picking your Shots

Step 2 : Creating a Layer Mask for the Blurring Effect

Step 3 : Masking the Sharp Area

Step 4 : Using Lens Blur

Adobe Photoshop has a lens blur option where you can get quite authentic looking lens blur with the options of adjusting the details and settings of an actual lens. To create the effect using lens blur will take longer than the normal Gaussian blur technique but the result is much better.
Step 5 : Setting the Depth Map

Step 6 : Lens Characteristic Settings

Step 7 : Remove Layer Mask

Next remove the layer mask which you had set earlier

Before & After


Have fun trying it out!
Published : Click! Issue 28 (2008)

I had to feel blurred writing this article! :-)
THE BEAUTY OF BLURRING

This issue is out on news stands in Jan 2009. In this issue I looked at the effect created by shooting extreme blurred photos on purpose. Despite how this is an unconventional way to shoot, appreciating the beauty of this form of photography takes a little understanding of what makes it work.
INTRO
"...Intentional blurring in photography can be regarded almost as an art form. Sometimes abstract but sometimes done intentionally to intensify an element in the picture, whether it is colours, lights or shape. Blurring blends colours into a gradual mix but not a total mix. Some form of blurring highlights on the contrast between light and shadows and others creating the soft gradient of a single hue..." (pick up a copy at newsstands and read more).

[ My wife’s earring never looked that good! ]